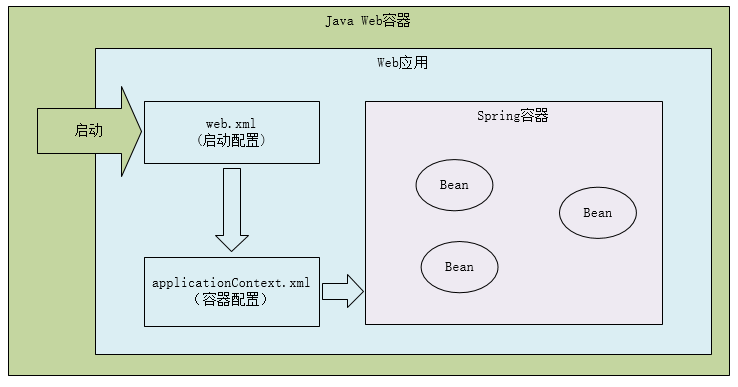
对于spring的配置,分为两块,我把它们称之为:
启动配置:Spring是集成到我们的应用中使用的,所以不同的应用有不同的方式来启动spring。最常见的场景是web应用,启动的配置在web.xml部署描述符中。对于其他的Java程序,可能通过代码调用的方式直接启动Spring,那么就没有启动配置了。
容器配置:Spring容器的配置,一般的名字是applicationContext.xml,指挥Spring如何搜索,装配Bean。
在Java Web中使用Spring大致是这个结构:
接下来我们来看看最精简的Java Web+Spring配置,然后在根据需求不断扩展。
首先新建一个Java web项目。添加spring依赖:
1 2 3 4 5 6 7 8 9 10 11 12 13 14 15 16 17 18 19 20 21 <properties > <org.springframework.version > 4.3.8.RELEASE</org.springframework.version > </properties > <dependencies > <dependency > <groupId > org.springframework</groupId > <artifactId > spring-context</artifactId > <version > ${org.springframework.version}</version > </dependency > <dependency > <groupId > org.springframework</groupId > <artifactId > spring-web</artifactId > <version > ${org.springframework.version}</version > </dependency > <dependency > <groupId > org.springframework</groupId > <artifactId > spring-webmvc</artifactId > <version > ${org.springframework.version}</version > </dependency > </dependencies >
在web.xml中加入配置:
1
2
3
4
5
6
7
8
9
10
11
12
13
14
15
16
<?xml version="1.0" encoding="UTF-8"?> <web-app xmlns ="http://xmlns.jcp.org/xml/ns/javaee" xmlns:xsi ="http://www.w3.org/2001/XMLSchema-instance" xsi:schemaLocation ="http://xmlns.jcp.org/xml/ns/javaee http://xmlns.jcp.org/xml/ns/javaee/web-app_3_1.xsd" version ="3.1" > <listener > <listener-class > org.springframework.web.context.ContextLoaderListener</listener-class > </listener > <context-param > <param-name > contextConfigLocation</param-name > <param-value > classpath:applicationContext.xml</param-value > </context-param > </web-app >
然后在resources目录下新建applicationContext.xml文件:
1
2
3
4
5
6
7
8
9
<?xml version="1.0" encoding="UTF-8"?> <beans xmlns ="http://www.springframework.org/schema/beans" xmlns:xsi ="http://www.w3.org/2001/XMLSchema-instance" xmlns:context ="http://www.springframework.org/schema/context" xsi:schemaLocation ="http://www.springframework.org/schema/beans http://www.springframework.org/schema/beans/spring-beans.xsd http://www.springframework.org/schema/context http://www.springframework.org/schema/context/spring-context.xsd" > <bean id ="demoBean" class ="com.mushan.spring.DemoBean" /> </beans >
其中我们声明了一个实例用的Bean:
1
2
3
4
5
public class DemoBean implements InitializingBean public void afterPropertiesSet () throws Exception System.out.println("init DemoBean" ); } }
这里让Bean实现InitializingBean接口是因为其afterPropertiesSet方法会在Bean实例化时调用,这样我们就能感知到容器启动并实例化Bean了。
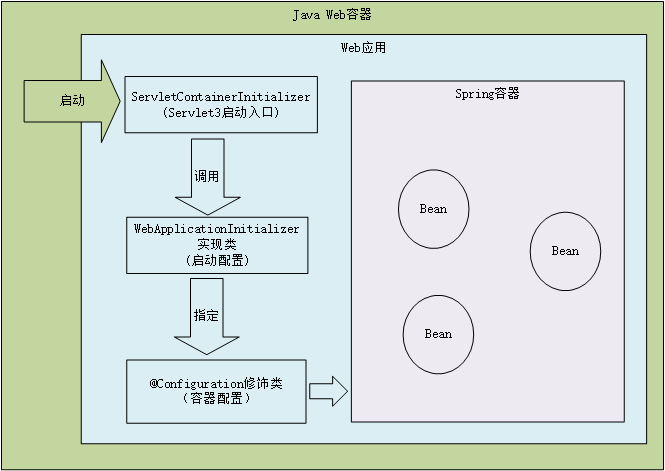
Java Config配置 Servlet3支持使用Java代码作为部署描述符的补充。所以启动配置可以从web.xml中移到Java代码中。利用Spring的支持,我们只要实现WebApplicationInitializer接口即可。
同时Spring支持使用Java来替代以前所使用的基于xml的applicationContext.xml配置。
所以配置结构如图:
启动配置代码如下:
1
2
3
4
5
6
7
8
9
10
public class MyWebApplicationInitializer implements WebApplicationInitializer public void onStartup (ServletContext servletContext) throws ServletException ServletRegistration.Dynamic registration = servletContext.addServlet("test" , new DispatcherServlet()); registration.setLoadOnStartup(1 ); registration.addMapping("/test/*" ); registration.setInitParameter("contextClass" , "org.springframework.web.context.support.AnnotationConfigWebApplicationContext" ); registration.setInitParameter("contextConfigLocation" , "AppConfig" ); } }
容器配置如下:
1
2
3
4
5
6
7
8
@Configuration public class AppConfig @Bean public TestServlet testServlet () return new TestServlet(); } }
同时Spring提供了WebApplicationInitializer接口的高层次封装AbstractAnnotationConfigDispatcherServletInitializer,只要实现其中的虚方法就行:
1
2
3
4
5
6
7
8
9
10
11
12
13
14
15
16
17
18
19
20
public class GolfingWebAppInitializer extends AbstractAnnotationConfigDispatcherServletInitializer @Override protected Class<?>[] getRootConfigClasses() { return new Class[] { GolfingAppConfig.class }; } @Override protected Class<?>[] getServletConfigClasses() { return new Class[] { GolfingWebConfig.class }; } @Override protected String[] getServletMappings() { return new String[] { "/golfing/*" }; } }
参考资料


